Wednesday, December 23, 2015

Welcome

Blog's Home page!

Blog Logo
Image shown in LinkedIn Media picture.

Welcome

Welcome to my blog and portfolio.

I am Marc Lemay. With this blog I have the opportunity to explain with more details the projects on which I have worked on since 1983.

My portfolio is an extension of my CV.

This blog also contains technical articles about computers, networks, Internet technologies, programming languages, Linux, Windows, and more...

Go to blog's Home page!

Monday, November 2, 2015

LAMP on CentOS 6.7

Using Apache with MySQL and PHP to Develop Web Applications

The Context

I had freshly installed CentOS 6.7. I had installed it as a developer workstation to be able to create applications using Linux, Apache, MySQL, and PHP (among other things).

What is LAMP ?

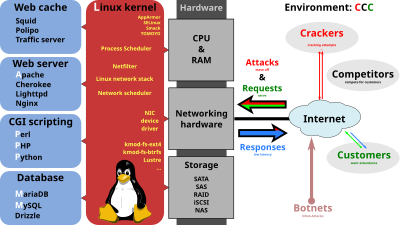
A high-level overview of LAMP's building blocks and overall system environment, displayed here in combination with optionally used web caches.
LAMP is an archetypal model of web service solution stacks, named as an acronym of the names of its original four open-source components: the Linux operating system, the Apache HTTP Server, the MySQL relational database management system (RDBMS), and the PHP programming language. The LAMP components are largely interchangeable and not limited to the original selection. As a solution stack, LAMP is suitable for building dynamic web sites and web applications.[1]

I was configuring the Apache web server. I wanted to test PHP with MySQL using an old PHP script I wrote back in 2006.

To my great disappointment, I've found out that the following command in my PHP script was not working:

// Connecting to the database server.
$connect = mysql_connect($db_addr, $db_user, $db_pass)
           or die("Could not connect : " . mysql_error());

All I was getting was a blank page displayed in my user agent (browser).

Note that mysql_connect() is a deprecated call. But my PHP script is one that I wrote in 2006.

The Solution

To obtain debug information when running the script, this is one thing you can do:

  1. Edit the file /etc/php.ini
  2. Change the variable
    display_errors = Off  to
    display_errors = On
  3. Restart the Apache server with:
    # service httpd restart
To fix my problem, I did the following commands:
# yum install php-mysql
# service httpd restart

And it worked... (although it took me a good amount of time to found this solution).
It seemed that the mysql module was not installed!!!

Sunday, October 25, 2015

How to Create a CD-ROM ISO Image with Linux

To create an ISO image of a DVD or CD-ROM disk, you can do it easily with any UNIX or Linux systems.

All you need is a Unix like system (real or virtual) that can read the digital disk.

The command dd(1) - convert and copy a file, is a very old Unix command than can be used to create an ISO image of any disks.
  1. Insert the CD or DVD medium into the machine.
  2. Unmount the CD-ROM device if mounted automatically:
    # umount /dev/cdrom
  3. Create a CD/DVD-ROM ISO image with the dd command:
    # dd if=/dev/cdrom of=/tmp/myimage.iso

Sunday, September 13, 2015

How to Rescue a Non-booting GRUB 2 on Linux

How to Rescue a Non-booting GRUB 2 on Linux

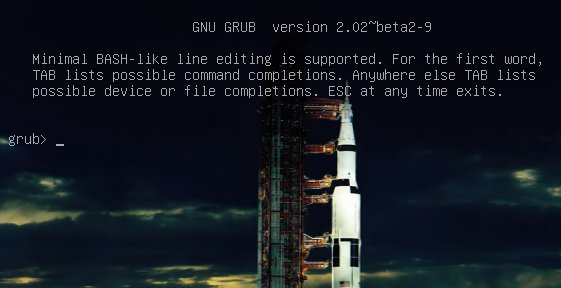
grub command shell
Figure 1: GRUB 2 menu with cool Apollo 17 background.
Once upon a time we had legacy GRUB, the Grand Unified Linux Bootloader version 0.97. Legacy GRUB had many virtues, but it became old and its developers did yearn for more functionality, and thus did GRUB 2 come into the world.
GRUB 2 is a major rewrite with several significant differences. It boots removable media, and can be configured with an option to enter your system BIOS. It's more complicated to configure with all kinds of scripts to wade through, and instead of having a nice fairly simple /boot/grub/menu.lst file with all configurations in one place, the default is /boot/grub/grub.cfg. Which you don't edit directly, oh no, for this is not for mere humans to touch, but only other scripts. We lowly humans may edit /etc/default/grub, which controls mainly the appearance of the GRUB menu. We may also edit the scripts in /etc/grub.d/. These are the scripts that boot your operating systems, control external applications such as memtest and os_prober, and theming./boot/grub/grub.cfg is built from /etc/default/grub and /etc/grub.d/* when you run the update-grub command, which you must run every time you make changes.
The good news is that the update-grub script is reliable for finding kernels, boot files, and adding all operating systems to your GRUB boot menu, so you don't have to do it manually.
We're going to learn how to fix two of the more common failures. When you boot up your system and it stops at the grub> prompt, that is the full GRUB 2 command shell. That means GRUB 2 started normally and loaded the normal.mod module (and other modules which are located in /boot/grub/[arch]/), but it didn't find your grub.cfg file. If you see grub rescue> that means it couldn't find normal.mod, so it probably couldn't find any of your boot files.
How does this happen? The kernel might have changed drive assignments or you moved your hard drives, you changed some partitions, or installed a new operating system and moved things around. In these scenarios your boot files are still there, but GRUB can't find them. So you can look for your boot files at the GRUB prompt, set their locations, and then boot your system and fix your GRUB configuration.

GRUB 2 Command Shell

The GRUB 2 command shell is just as powerful as the shell in legacy GRUB. You can use it to discover boot images, kernels, and root filesystems. In fact, it gives you complete access to all filesystems on the local machine regardless of permissions or other protections. Which some might consider a security hole, but you know the old Unix dictum: whoever has physical access to the machine owns it.
When you're at the grub> prompt, you have a lot of functionality similar to any command shell such as history and tab-completion. The grub rescue> mode is more limited, with no history and no tab-completion.
If you are practicing on a functioning system, press C when your GRUB boot menu appears to open the GRUB command shell. You can stop the bootup countdown by scrolling up and down your menu entries with the arrow keys. It is safe to experiment at the GRUB command line because nothing you do there is permanent. If you are already staring at the grub> or grub rescue>prompt then you're ready to rock.
The next few commands work with both grub> and grub rescue>. The first command you should run invokes the pager, for paging long command outputs:
grub> set pager=1
There must be no spaces on either side of the equals sign. Now let's do a little exploring. Type ls to list all partitions that GRUB sees:
grub> ls
(hd0) (hd0,msdos2) (hd0,msdos1)
What's all this msdos stuff? That means this system has the old-style MS-DOS partition table, rather than the shiny new Globally Unique Identifiers partition table (GPT). (See Using the New GUID Partition Table in Linux (Goodbye Ancient MBR). If you're running GPT it will say (hd0,gpt1). Now let's snoop. Use the ls command to see what files are on your system:
grub> ls (hd0,1)/
lost+found/ bin/ boot/ cdrom/ dev/ etc/ home/  lib/
lib64/ media/ mnt/ opt/ proc/ root/ run/ sbin/ 
srv/ sys/ tmp/ usr/ var/ vmlinuz vmlinuz.old 
initrd.img initrd.img.old
Hurrah, we have found the root filesystem. You can omit the msdos and gpt labels. If you leave off the slash it will print information about the partition. You can read any file on the system with the cat command:
grub> cat (hd0,1)/etc/issue
Ubuntu 14.04 LTS \n \l
Reading /etc/issue could be useful on a multi-boot system for identifying your various Linuxes.

Booting From grub>

This is how to set the boot files and boot the system from the grub> prompt. We know from running the ls command that there is a Linux root filesystem on (hd0,1), and you can keep searching until you verify where /boot/grub is. Then run these commands, using your own root partition, kernel, and initrd image:
grub> set root=(hd0,1)
grub> linux /boot/vmlinuz-3.13.0-29-generic root=/dev/sda1
grub> initrd /boot/initrd.img-3.13.0-29-generic
grub> boot
The first line sets the partition that the root filesystem is on. The second line tells GRUB the location of the kernel you want to use. Start typing /boot/vmli, and then use tab-completion to fill in the rest. Type root=/dev/sdX to set the location of the root filesystem. Yes, this seems redundant, but if you leave this out you'll get a kernel panic. How do you know the correct partition? hd0,1 = /dev/sda1. hd1,1 = /dev/sdb1. hd3,2 = /dev/sdd2. I think you can extrapolate the rest.
The third line sets the initrd file, which must be the same version number as the kernel.
The fourth line boots your system.
On some Linux systems the current kernels and initrds are symlinked into the top level of the root filesystem:
$ ls -l /
vmlinuz -> boot/vmlinuz-3.13.0-29-generic
initrd.img -> boot/initrd.img-3.13.0-29-generic
So you could boot from grub> like this:
grub> set root=(hd0,1)
grub> linux /vmlinuz root=/dev/sda1
grub> initrd /initrd.img
grub> boot

Booting From grub-rescue>

If you're in the GRUB rescue shell the commands are different, and you have to load thenormal.mod andlinux.mod modules:
grub rescue> set prefix=(hd0,1)/boot/grub
grub rescue> set root=(hd0,1)
grub rescue> insmod normal
grub rescue> normal
grub rescue> insmod linux
grub rescue> linux /boot/vmlinuz-3.13.0-29-generic root=/dev/sda1
grub rescue> initrd /boot/initrd.img-3.13.0-29-generic
grub rescue> boot
Tab-completion should start working after you load both modules.

Making Permanent Repairs

When you have successfully booted your system, run these commands to fix GRUB permanently:
# update-grub
Generating grub configuration file ...
Found background: /usr/share/images/grub/Apollo_17_The_Last_Moon_Shot_Edit1.tga
Found background image: /usr/share/images/grub/Apollo_17_The_Last_Moon_Shot_Edit1.tga
Found linux image: /boot/vmlinuz-3.13.0-29-generic
Found initrd image: /boot/initrd.img-3.13.0-29-generic
Found linux image: /boot/vmlinuz-3.13.0-27-generic
Found initrd image: /boot/initrd.img-3.13.0-27-generic
Found linux image: /boot/vmlinuz-3.13.0-24-generic
Found initrd image: /boot/initrd.img-3.13.0-24-generic
Found memtest86+ image: /boot/memtest86+.elf
Found memtest86+ image: /boot/memtest86+.bin
done
# grub-install /dev/sda
Installing for i386-pc platform.
Installation finished. No error reported.
When you run grub-install remember you're installing it to the boot sector of your hard drive and not to a partition, so do not use a partition number like /dev/sda1.

But It Still Doesn't Work

If your system is so messed up that none of this works, try the Super GRUB2 live rescue disk. The official GNU GRUB Manual 2.00 should also be helpful.

Monday, June 29, 2015

Marc Lemay's Curriculum Vitae

Marc Lemay
Programmer Analyst
Phone: 450-661-4602         E-mail: Lemay.Marc@gmail.com
 View my LinkedIn profile
 My Portfolio
My career portfolio: marclemayportfolio.blogspot.ca/


PROFILE

  • Programmer mastering the art of writing excellent, well commented, and efficient code.
  • Worked in several small organizations and also for a multinational enterprise with a larger development team.
  • Solid experience in 3D computer graphics on Silicon Graphics workstations.
  • Expert in geometry and mathematics in general: linear algebra, differential and integral calculus, discrete mathematics, statistics and probabilities.
  • Bilingual, can speak, read and write in both French and English.
  • Long experience in SR&ED - Scientific Research and Experimental Development - Good at trying to solve difficult problems and writing reports for tax credits.
  • Good technical writer and communicator.
  • Enjoy working in a team environment. Can also work independently.
  • Love to share wisdom about computers and Internet technologies.

TECHNICAL SKILLS

Applications:      CAD/CAM (computer-aided design and computer-aided manufacturing), Transport, Manufacturing, Accounting, Server‑Client app., Information Technology

Platforms:           UNIX (SGI IRIX, IBM AIX, Linux), Windows, VAX VMS

Languages:         C, C++, Java, JSP, Visual Basic, SQL, Informix 4GL, Assembly (Intel, Motorola, MIPS)

Scripts:               PHP, JavaScript, bash, tcsh, Perl

RDBMS:            Informix, Oracle, IBM DB2, MySQL, MS SQL Server, MS Access

Tools:                 MS Office, Photoshop, GIMP, MS Visual Studio, NetBeans, Eclipse, WebSphere, Struts/Tiles, Movie Maker, kdenlive, Oracle VM VirtualBox
Google Apps: Docs, Drive, Earth, Search, Maps, Sites, Blogs, Google+

Networking:       TCP/IP, UDP/IP, HTTP, HTML, CSS, XML, Apache and Tomcat web servers, NFS, Samba, DNS, DHCP, FTP, SMTP, JavaMail, SSL (Secure Sockets Layer), WireShark packet sniffer, iptables firewall, router configuration and port forwarding

PROFESSIONAL EXPERIENCE

MLC - Marc Lemay Consultant, 2006 - present

Freelance consultant performing software development, troubleshooting, and training.

GIE Technologies Inc., 2006 - 2010

Engineering Firm Evaluating Infrastructures
Jobs/Tasks: Developing and documenting C++ applications.
Projects:
Ø       ICS - The Image Capture System
Mobile vision system with FireWire cameras and other components to survey highway infrastructures.
Ø       The Image Post-Processor
A program to convert in JPEG, GIF, TIFF, and other formats, the raw images acquired by ICS.
Ø       TLPS - The Transverse Laser Profiling System
A system of high performance 3D laser profilers that are able to measure complete transverse road profiles with 1mm resolution at highway speeds to detect cracks, potholes, and measure ruts.
Publication:
Co-written an article about the Image Capture System
http://www.ptgrey.com/case-study/id/10383

Vortex International, 2005

Aquatic Structures Manufacturer
Projects:
Ø       Modified/Improved a Bill of Material (BOM) system implemented in MS Access.
Ø       Transferred the BOM data to a new system programmed in COBOL and using a MS SQL Server.
Ø       Added new reports to the system using Crystal Reports.

The Canadian National Railway (CN), 1999 -2004

North America's Railroad
Projects:
Ø       MPS - The Motive Power (or locomotive management) System
o        Added in MPS the IC (Illinois Central Railroad) after the CN acquired it.
o        Debugged MPS and added new functionalities to it.
o        Improved MPS database access speed by implementing RPC (Remote Procedure Call) with UNIX daemons in a client/server model on the WAN.
Ø       PMRC - The Performance Monitoring and Rule Compliance Database Loader
Created and documented a super fast application to import data to an IBM DB2 database running on an IBM AIX server.
Jobs/Tasks:
Ø       Programming, improving, debugging, documenting
Ø       Analysing and proposing improvements to existing systems.
Ø       Knowledge transfer to CN IT permanent employees

D.P. Digital Precision Inc., 1987 - 1999

High Precision Wire EDM Machining Services
Projects:
Ø       NP3 - The New Profil Compiler
A programming language based on IBM APT with full geometry computing features.
Ø       Japax, Mitsubishi, and Charmilles F45 Post-Processors
Ø       Utilities for plotting on Tektronik and HP LaserJet plotters and printers
Ø       Toolpath Generator for 2-5 axis CNC integrated in the CAD program ICEM/DDN
Ø       DP Expert
Ø       Many other projects:  All detailed on 67 pages in my portfolio if you are interested.
Jobs/Tasks:
Ø       Programming/developing and documenting applications
Ø       Scientific Research and Experimental Development - Wrote reports for tax credits
Ø       Training employees and knowledge transfer
Ø       Managed a LAN with 15 computers and 14 CNC

La Maison de l’ordinateur inc., 1983 - 1987

Computer Store Selling Software and Hardware
Jobs/Tasks:
Ø       Sales representative for Apple Computers
Ø       Part-time Manager

EDUCATION AND TRAINING

B.Sc.A. - 1994            University of Quebec in Montreal (UQAM)
                                    Bachelor of Science in Computer Sciences and IT Management.
D.E.C. - 1987              Montmorency College in Laval
                                    Computer Science Technology
D.E.S. - 1983              College Laval in Laval
                                    General high school diploma
2005-2006                   Training in Java EE (13 months) at Richard & Associates.
                                    Developed an application using the WebSphere IDE,
                                    Struts/Tiles, IBM DB2 to store the persistent data on a server.

Saturday, April 18, 2015

Traquage sur Internet

Traque interdite : ils sont nombreux à vous épier sur le web

Sandra Rodriguez
Sandra Rodriguez     Photo : Radio-Canada/Michel Harvey
Le webdocumentaire Traque interdite, lancé cette semaine, propose une incursion dans l'ensemble des logiciels qui emmagasinent de l'information sur les internautes. On sait que les publicitaires collectent des données sur les internautes, mais pas que les traces que ces derniers laissent sont accessibles à beaucoup plus de personnes que les publicitaires. Matthieu Dugal en discute avec l'une des réalisatrices du webdocumentaire et chercheuse dans le domaine, Sandra Rodriguez.

Science et technologie
Nos traces laissées sur le web
Le samedi 18 avril 2015

Bande annonce


Image tirée de la série documentaire Traque interdite avec réalisatrice Sandra Rodriguez
Image tirée de la série documentaire Traque interdite avec réalisatrice Sandra Rodriguez     Photo : ONF
Lancé récemment, le webdocumentaire Traque interdite fait déjà beaucoup réagir. Produit entre autres par l'Office national du film, il offre à l'internaute de voir ce qu'on lui cache généralement, soit les traces qu'il laisse lorsqu'il navigue. Dans sa chronique « Sous le net » au Téléjournal, Matthieu Dugal explique comment nous sommes constamment épiés sur Internet.

À mi-chemin entre le site web et le documentaire traditionnel, Traque interdite invite l'internaute à suivre le documentariste dans cette expérience afin qu'il puisse voir les traces qu'il laisse derrière lui lorsqu'il navigue sur le web. Il est possible d'être plus anonyme, mais non sans difficulté. Le but de cette traque pour les commerçants est de connaître nos goûts et nos sujets de prédilection pour mieux nous cibler en tant que consommateur. De plus, personne ne sait ce qu'il advient de ces données de masse, ce qu'on appelle le big data. Une chose est certaine, l'enjeu monétaire est important. En 2014, le site YouTube a fait 5 milliards de dollars avec les publicités. Celles publiées sur Facebook rapporteront autant d'ici 2017.

Un lien vers un blogue sur l'ONF

Reprenez le contrôle de votre identité numérique grâce à Traque interdite.

Sunday, March 29, 2015

Having a Ubuntu Root Account with a Password

Where is the Root Account Now?

Recently, I have installed and been using Ubuntu. That's a very popular Linux distribution.

You see, I'm an old UNIX geek and I have found out that these new Linux distributions are now much more simpler to install.  It is as simple as installing a Windows 7 operating system.

This is very good for the ordinary personal computer user. They ask you only the language you wish to use, they also want to know your time zone, and finally, you create a user with a password.

This user will have administrative privileges, after a successful authentication, when required by some operations.

Though sometimes, you really want to become root, the Super User, to perform modifications in your system. Otherwise, you will need to prefix every administrative commands with sudo and type your password every time administrative credentials are required. This can be a pain if you have several commands to execute as root.

To create a root account with a password, you need to do this once:

Figure 1 - Giving a new password to root


As you can see in the above terminal, you proceed like this:
  1. sudo su
  2. Enter the password for marc in this case - he is a system administrator.
  3. Then, use the command passwd - to change the root password.  You can also type passwd root if you want to be more explicit.
  4. Type two times the new password for root.
  5. And voilà!
Note: The passwords are not echoed in the terminal for security reasons.